Apple released the macOS Catalina to compatible Mac computers few months back. You checked out all the new features it brings, and quickly upgraded to the new version. But now, for some reason, you want to go back to the good-old macOS Mojave. Catalina may still contain some bugs that could affect your experience with the new version of macOS. Here’s how you can go downgrade from macOS Catalina to macOS Mojave. The process is more complicated than merely reverting to Mojave.
Step-1: If you have a Mac with T2 security chip, do this first
If you own the 2017 or newer iMac Pro, or the 2018 or newer MacBook Air, MacBook Pro, and Mac mini, you have to make sure that it allows external booting. These devices feature Apple’s T2 security chip for secure booting and encrypted storage.
If you own one of these Macs, restart the Mac and hold down the Command+R keyswhen you see the Apple logo. It will put the device in Recovery Mode. Now click Utilities in the menu bar and then click Startup Security Utility from the drop-down menu. Then enter the administrator credentials and check the box next to Allow booting from external media.
You don’t have to enable it if your Mac doesn’t have the T2 chip.
Step-2: Back up all your data before you plan to downgrade to macOS Mojave
You’ll have to erase macOS Catalina from the hard drive, which means all your data will be wiped out from the Mac. So, take a complete backup of your Mac on an external drive or in the cloud.
Step-3: Download macOS Mojave
Head over to the Mac App Store and download the macOS Mojave. You are going to need a copy of macOS Mojave on an external drive.
Step-4: Create a bootable installer drive for macOS Mojave
Take an external drive with at least 8GB of storage. Connect it to the Mac and go to Finder > Applications > Utilities > Disk Utility. Now select your external drive and click Erase.
Note down the name of the external drive because you are gonna need it to create a bootable drive. If your Mac uses APFS, select APFS from the format. If it’s using HFS+, select MacOS Extended. If Scheme is available, select GUID Partition Map and click Erase. Click Done when the process is complete.
Next, you have to make the external drive bootable. To do that, go to Finder > Applications > Utilities > Terminal. Now type the following text into the Terminal. Don’t forget to replace “YourExternalDriveName” with the name of your external drive that you noted down earlier.
sudo /Applications/Install\ macOS\ Mojave.app/Contents/Resources/createinstallmedia –volume /Volumes/YourExternalDriveName
Now hit the Enter/Return key and enter the administration password. Then type the ‘Y’ key to confirm that you want to erase the drive, and press Return. Depending on your drive, it could take a while to complete the process. The Terminal will report Done when it’s complete.
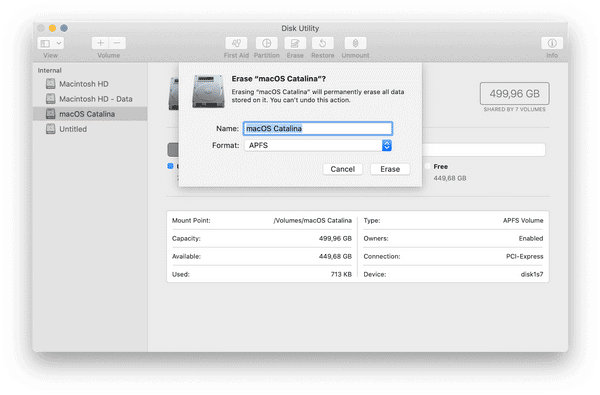
Step-5: Erase the Mac’s hard drive
Before you can downgrade from Catalina and install macOS Mojave, you have to erase your Mac’s drive. Don’t connect the external drive yet. Connect the Mac to the Internet via Ethernet or WiFi. Restart the computer and hold down the Command+R keys until the computer enters the Recovery mode.
In the OS X Utilities selector, click on the Disk Utility then Continue. Next, select your Mac’s primary Startup Disk and click Erase. Now enter the name for the file to be destroyed. Then select Mac OS Extended or APFS from the format list, and select GUID Partition Map if Scheme is available. Then click the Erase button. Once the process is complete, quit Disk Utility from the drop-down to go back to the OS X Utilities selector.
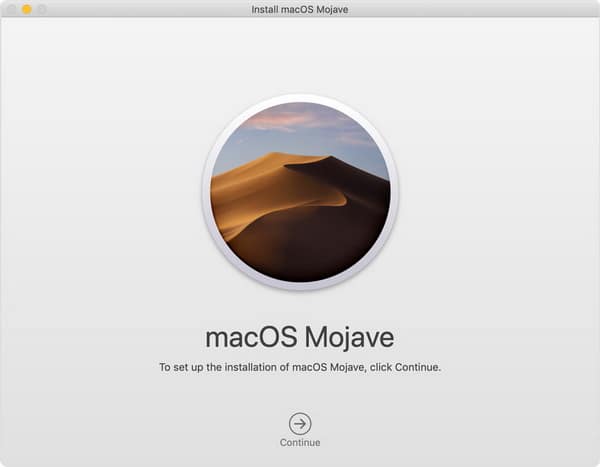
Step-6: Install macOS Mojave
If your Mac came with macOS Mojave pre-installed at the time of purchase, restart and then hold down the Shift, Option, Command and R keys at the same time. It will automatically install macOS Mojave on your Mac.
If you don’t fall into that group, connect the Mac to the Internet, plug in the bootable installer drive that you created, and restart the computer. Hold down the Option key as the Mac restarts. You’ll be presented with a list of startup disks. Select your bootable drive from the list and click Continue.
Now Mojave will begin installing on the Mac. You’ll have to agree to Apple’s terms & conditions before it reboots on the Mac.
Step-7: Restore the settings and files
If you recently took a backup of your Mac using Time Machine, you can use it to reinstall the settings and files for Mojave. To do that, connect the Mac to the Internet and restart it. Hold down the Command+R keys as the computer restarts to enter the Recovery mode. From the OS X Utilities selector, click the Restore from Time Machine Backup option.
Next, click Continue and again Continue. Then select the Backup source and click Continue. Select the most recent macOS Mojave backup and click Continue. Now the computer will restore the backup from Time Machine and reboot. After the reboot, it will be running macOS Mojave with pre-Catalina settings.
Add Comment